Showing posts with label Disk Partitioning. Show all posts
Pawan Sharma | May 16, 2012 | Be the first to comment!

Removing LV, VG and PV

In this post we will see haw to remove Logical Volume, Volume Group and Physical Volume. The order is, to remove Logical Volume first, then Volume Group and then Physical Volume.

1. To delete a Logical Volume first unmount the LV:
umount <mount_point>
 
2.  Then remove Logical Volume using lvremove command:
lvremove <lvname>

Removing LV, PV and VG
After removing Logical Volume now we can remove Volume group

  • To remove Volume Group use vgremove command:
           vgremove <vgremove>
Removing Logical Volume
 
  •  To remove Physical Volume use pvremove command:
            pvremove <pvname>

Removing Physical Volume

 Here we complete the LVM part of RHCSA and RHCE exam objective. For any questions related to Logical Volume Manager please post comments.
Pawan Sharma | | Be the first to comment!

Reducing Size of Logical Volume

In this post we will learn how to reduce size of a Logical Volume. It is not suggested to reduce a Logical Volume, as it may lead to data loss, but sometimes it is required to reduce a LV. If there is Logical Volume which is not using all the space an you have to take some space from it and give it to other mount point, in such situation we require to reduce a LV.

In this example we will reduce Logical Volume lvdata1 from 1Gb to 300Mb.

1. To reduce a Logical Volume first we have to unmount the LV using umount command.
2. Then run command e2fsck to verify the file system. This command will run a file system check on the Logical Volume:
e2fsck -f <full_path_of_Logical_Volume>
Reducing Logical Volume.
3. Then run command resize2fs to resize the file system to 300Mb.
resize2fs /dev/DATAVG/lvdata1 300M.
 
Then reduce LV using lvreduce command:
lvreduce –L 300M /dev/DATAVG/lvdata1.
Reducing Mount Point Size in RHEL

After resizing mount point, mount the mount point using mount -a command.

Be very careful when reducing the Logical Volume as it may cause data loss. In the next post we will see how to remove LV, VG and PV.
If you have any questions please feel free to comment.


Pawan Sharma | May 15, 2012 | Be the first to comment!

Extending Logical Volume

In this post we will see how to how to increase or decrease size of a Logical Volume online. Online means that you can change (extend or reduce) the size of a mount point while it is mounted and is used by any program without any data loss. Yes RHEL have this facility to extend or reduce a mount point online. This is very useful when you can’t unmount the mount point and have to increase the size of it.

It is one of the RHCSA objective which is also used very frequently in production environment. This objective is mostly used where there are database on the server. As data increase in mount point it is required to extend the mount point. In this post we will see how to increase a size of a mount point and in next post we will see how to reduce size of a mount point.

1. To extend a Logical Volume we need free space in its respective VG. In the below image we can see that Volume Group DATAVG have 1.88 GB free space. Use command vgdisplay to show free space in Volume Group.
Extending Logical Volume in RHEL
In the above image we can see that is something like 510/1.99 GB. Here 510 is Physical Extents(PE), above image shows that each PE size is 4 Mb.
To extend a Logical Volume it is not needed to unmount it, also it can be used at the time of extending.
2. In this example we will extend Logical Volume lvindx by 500Mb, which is mounted on /indx.  To extend lvindx by 500Mb use below command:
lvextend –L +500M /dev/DATAVG/lvindx
Note: if you don's add "+" sign in front of size the Logical Volume would be re-sized to 500M.
Extending Mount Point in RHEL.
In the above image output of lvscan command shows the increased size but df –Ph does not shows the extended size, /indx is still 1008M as before. This is because the LV has been extended but to take effect we have to run a command to add the extended spate to a mounted Logical Volume.
3.Now to extend the mount point online user resize2fs command:
resize2fs /dev/DATAVG/lvindx
Extending mount point with LV in RHEL
Above command will reflect changes and make the mount point extended online without affecting the existing data on the mount point.
That’s how you can increase size of a mount point. In the next post we will see how to reduce a Logical Volume.


Pawan Sharma | May 13, 2012 | Be the first to comment!

Renaming Volume Group and Logical Volumes


In this post we will learn how to rename a logical volume or Volume group. Renaming Logical Volumes and Volume Groups is an important objective of RHCSA and RHCE certification exam. In the exam you would we asked to rename a LV or VG. This RHCSA/RHCE objective is not only important for the certification exam point of view but also for the real system administration environment. Many times in the production environment we need to rename the Logical Volume Groups and Logical Volume. So it is very important to learn how LVM and partitioning works in LINUX.

While renaming a  Logical Volume or Volume group it is important to take precautions as it may lead to data loss if you do something wrong. To rename a Logical Volume first we have to unmount the LV and then rename it using lvrename command. And to rename a Volume Group first we have to unmount all LVs in that VG and also deactivate all LVs (Under that VG) to use vgrename commang. Steps given below will explain the process more easily.

1. To rename a Logical Volume, first we have to unmount the LV using umount <mount_point>.
Renaming Logical Volume
2. Then rename the Logical Volume using lvrename command: 
lvrename <old_lvname> <new_lvname>  and then mount the LV using mount command and make changes to /etc/fstab.
Rename Volume Group in RHEL 6
 In the next example we will rename the Volume Group.
1. To rename the VG first unmount the mount all mount points in the VG:
 umount <mount_point>
2. And then deactivate the Volume Group to inactive all LVs in it. Using vgchange command.
vgchange -an <vg_name>
Renaming Logical Volume
3. Then rename the VG using vgrename command.
vgrename <vg_name>
4. After renaming the Volume Group use vgchange command to activate all LVs in VG.
vgchange -ay <vg_name>
Rename LogicalVolume
4. After activating all Logical Volumes mount the LVs and make changes to /etc/fstab to make changes persistent.

That’s how we can rename Logical Volume and Volume Group. In the next post we will see how to extend and reduce LVs online.

If you have any questions or quires add comments.

Pawan Sharma | May 1, 2012 | Be the first to comment!

LVM Part 2: Creating PV, VG and LV

In this post we will see how to create LVM partitions. LVM is one of the most important objectives of both RHCSA and RHCE. Also it is the most important and useful tool for Linux system administrators as it provides facility of extending and reducing partitions online.
LVM covers following topics.
  1. Creating Physical Volumes
  2. Creating Volume Group.
  3. Creating Logical Volumes.
  4. Rename Volume Group.
  5. Rename Logical Volume.
  6. Extending Logical Volume Online.
  7. Extending Logical Volume Online.
  8. Reducing Volume Group.
  9. Deleting Logical Volume.
  10. Deleting Volume Group
  11. Deleting Physical Volume.
In the previous post I mentioned that the Physical Volume can be a partition or a whole disk.  To see current partitions and disks use fdisk –l. In this example I will use the whole disk to create a Physical Volume.

1. First select the disk from which you have to create the Physical Volume. In this example I am using the second and third disk (sdb and sdc) to create two PV.

2. Use fdisk to create partition on the required hard disc and create a partition of whole disk as shown below.
Partition manager in RHEL 6

3. Now change type of partition to LINUX LVM. For that press t to edit the partition type and select 8e (Linux LVM) and use p to print partition table and save it using wq.

Disk partitioning in RHEL6

Note. It is not required to change the partition type to 8e (Linux LVM), this is just for the refrence.

4. Now use pvcreate command to create the Physical Volume. Ex pvcreate /dev/sdb1, I have created one more PV with disc sdc, and use pvdisplay/pvscan command to view Physical volume.
Disk partitioning in RHEL6
5. Now create Volume Group using these two PVs.

Ex: vgcreate <VG_NAME> /dev/sdb1 /dev/sdc. And use vgscan/vgdisplay command to view the VG.
Disk partitioning in RHEL6


In the above image we can see that there is 3.99GB/1022 PE free space we will create two LVs of 1 GB each.


6. From the above volume group we can create logical volumes as we like, in this example I will create 2 logical volumes each of size 1 GB.

lvcreate –L 1G –n lvdata MYVG0
-L is for size
-n is for lvname.

MYVG01 is VG name from which we have to create the LV.

The above command will create a LV of size 1GB. We can see the created logical volume by lvscan/lvdisplay command.
Disk partitioning in RHEL6

In this example we will create LV using physical extents. In vgdisplay command we can see that Physical Extent size is 4Mb therefore to create LV of size 1Gb we need 256 Physical Extents (PE).
lvcreate –l 256 –n lvdata1 MYVG01
Here –l is for number of PE.

     Disk partitioning in RHEL6

7. Now to use these LVs first we have to create file system (format) of these LVs using mkfs.ext4 command.
  • mkfs.ext4 /dev/MYVG01/lvdata
  • mkfs.ext4 /dev/MYVG01/lvdata1
8. Now to mount these LVs on directories, first create two directories and then use mount command to mount these LVs. To make these changes persistent make entry in fstab.

Disk partitioning in RHEL6

Disk partitioning in RHEL6

In the next post we will see how to rename Volume Groups and Logical Volumes. If you have any questions and queries please post comments.
Pawan Sharma | October 19, 2011 | | Be the first to comment!

Logical Volume Manager in RHEL 6: Part1

Logical Volume Manager also known as LVM is one of the most important topic, not only for the RHCSA exam preparation but also for the real environment System Administration. In production environment the disk partitioning is mostly based on LVM because of facilities and ease provided by Linux Logical Volume Manager. LVM provide facility to create partitions flexibly. For example using LVM we can make a volume group using a chunk of hard-disks, and from that volume we can create partitions as required. LVM gives System Administrator, power to extend or reduce the partitions online, means we can extend a logical volume while the data on it is being accessed by the users, without corruption of data.

It is important to understand the basic concept of LVM. There are mainly three steps(points) to create LVM:
  • Physical Volume:- Actual hard-disk or a partition of disk.
  • Volume Group :- Group of one or more than one physical Partition(s).
  • Logical Volume :- Partition created from Volume Group.
LVM in RHEL 6
 In the above example there are three disks (can also use partitions of disk) made as Physical Volume(PV), lets say size of each Physical Volume be 20 GB. From these three Physical volumes we create a Volume Group(VG), so the size of that Volume Group is 20 x 3 = 60 GB. From that Volume Group we can create multiple Logical Volumes (partitions) of different sizes or a single partition of 60 GB. We can use the whole volume group at a time, or can use create partitions when required. 


Lets take a simple example: We have created a Volume Group named VGDATA of size 60 GB using three 20 GB Physical Volumes. From Volume Group "VGDATA" we created two Logical Volumes "lvdata1" and "lvdata2" each of size 30 GB and mounted them on /data1 and /data2 respectively. After a period of time we feel that directory /data2 is getting full and need more space, we can do that by adding a new hard-disk of size 25 GB and making it a Physical Volume. Now we can extend the Volume Group VGDATA by adding the new Physical Volume to it. So now size of VGDATA becomes 85 GB. Now we can extend the Logical Volume "lvdata2" to appropriate size.

This is a general overview of Redhat Enterprise Linux Logical Volume Manager (LVM). In the next post we will learn commands and process to create LVMs'.


For any questions or quires please comment.
Pawan Sharma | September 12, 2011 | | Be the first to comment!

Creating and Deleting Partitions in RHEL 6

Partitioning is a very important concept in Linux. If you have your concepts clear,  related to partitioning in Linux, it will be very helpful when you became a Linux System Administrator.

There is a new partitioning tool RHEL6 cfdisk, but we will see the traditional and most popular partitioning tool "fdisk". To use fdisk first you have to login as root. if you are a regular user and know root password, you can switch to root account using "su" command.
  • To see your current disk and partitions run: fdisk -l

In the above image you can see that I have two hard disks. The first one is /dev/sda and the other one is /dev/sdb. In the above image you can see that the HDD /dev/sda is of size 16 GB and having two partitions /dev/sda1, which is created at the time of installation as /boot, and /dev/sda2, which is a Linux Logical Volume Manager(LVM). The second HDD is /dev/sdb which is newly installed HDD of size 2 GB and does not contain any valid partition table as you can see in the image.

In this post we will create the physical partitions and mount them on particular directories.
  • To create a partition of 1 GB form /dev/sdb type :fdisk /dev/sdb, and press m to see menue.
  •  Press n to create new partition, p to create primary partition and e to create extended(always create first partition as primary), make partition 1, select first cylinder as default and on next line type +size of partition to be created,ex +1G.


  • Now press p to print current partition table and press w to save partition table. and on command prompt type partprobe to update current partition table and run fdisk -l /dev/sdb.

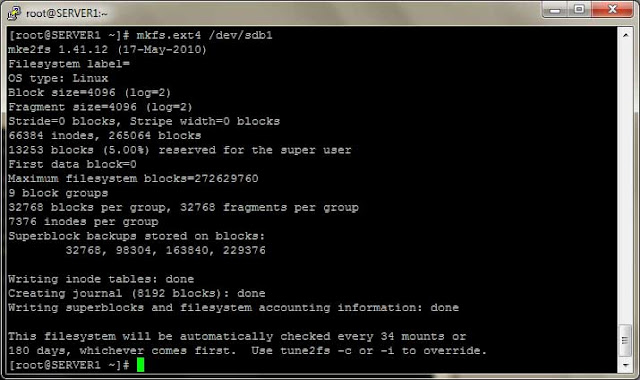
  •  Now format this partition with command : mkfs.ext4 /dev/sdb1. Then create a directory /mydata, and mount /dev/sdb1 on /mydata using command : mount /dev/sdb1 /mydata.


  • Make entry in /etc/fstab to make mounting persisting, means mount /mydata every time when server restart.
In next post we will learn how to create partition using Linux Logical Volume Manager(LVM) .
Please comment if you have any doubts.