Pawan Sharma | October 19, 2011 | | Be the first to comment!

Logical Volume Manager in RHEL 6: Part1

Logical Volume Manager also known as LVM is one of the most important topic, not only for the RHCSA exam preparation but also for the real environment System Administration. In production environment the disk partitioning is mostly based on LVM because of facilities and ease provided by Linux Logical Volume Manager. LVM provide facility to create partitions flexibly. For example using LVM we can make a volume group using a chunk of hard-disks, and from that volume we can create partitions as required. LVM gives System Administrator, power to extend or reduce the partitions online, means we can extend a logical volume while the data on it is being accessed by the users, without corruption of data.

It is important to understand the basic concept of LVM. There are mainly three steps(points) to create LVM:
  • Physical Volume:- Actual hard-disk or a partition of disk.
  • Volume Group :- Group of one or more than one physical Partition(s).
  • Logical Volume :- Partition created from Volume Group.
LVM in RHEL 6
 In the above example there are three disks (can also use partitions of disk) made as Physical Volume(PV), lets say size of each Physical Volume be 20 GB. From these three Physical volumes we create a Volume Group(VG), so the size of that Volume Group is 20 x 3 = 60 GB. From that Volume Group we can create multiple Logical Volumes (partitions) of different sizes or a single partition of 60 GB. We can use the whole volume group at a time, or can use create partitions when required. 


Lets take a simple example: We have created a Volume Group named VGDATA of size 60 GB using three 20 GB Physical Volumes. From Volume Group "VGDATA" we created two Logical Volumes "lvdata1" and "lvdata2" each of size 30 GB and mounted them on /data1 and /data2 respectively. After a period of time we feel that directory /data2 is getting full and need more space, we can do that by adding a new hard-disk of size 25 GB and making it a Physical Volume. Now we can extend the Volume Group VGDATA by adding the new Physical Volume to it. So now size of VGDATA becomes 85 GB. Now we can extend the Logical Volume "lvdata2" to appropriate size.

This is a general overview of Redhat Enterprise Linux Logical Volume Manager (LVM). In the next post we will learn commands and process to create LVMs'.


For any questions or quires please comment.
Pawan Sharma | October 18, 2011 | 1 Comment so far

RHCSA FEES UPDATE...

This Diwali, Redhat gives you special offers on certifications. There are two schemes for RHCSA + RHCE certifications form 5 September to 22nd November.

SCHEME 1 :- "FESTIVAL DOUBLE BLAST"
Applicable from 5th September 2011 - 20th November 2011)

"RHCSA + RHCE" at INR 15,000/- with free second attempt on RHCSA or RHCE or both *

SCHEME 2 :- "FESTIVAL DOUBLE BLAST WITH VIRTUALIZATION"
 Applicable from 5th September 2011 - 20th November 2011)

"RHCSA + RHCE" at INR 19,900/- with free second attempt on RHCSA or RHCE or both
& “RHCVA” single attempt at just INR 100/- *
"

* Terms and Conditions
1. This scheme is applicable only for candidates who have undergone Red Hat (RHEL 6) official curriculum training.
2. This scheme is applicable only for candidates who register for any one of the above mentioned schemes between 5th September 2011 & 20th November 2011.
3. The fee and offer is as follows:
SCHEME EXAM FEE OFFER
RHCSA + RHCE (Double Attempt) INR 15,000/- "RHCSA + RHCE" at INR 15,000/- with free second
attempt on RHCSA or RHCE or both

RHCSA + RHCE (Double Attempt) & RHCVA (Single Attempt) INR 20,000/- (INR 19,900/- + INR 100/-)

"RHCSA + RHCE" at INR 19,900/- with free second attempt on RHCSA or RHCE or both & “RHCVA” single attempt at INR 100/- *
4. The last date to register for any one scheme is 20th November 2011.
5. The last date to appear for first attempt of RHCSA & RHCE exam is 25th November 2011.
6. The last date to appear for second attempt of RHCSA & RHCE exam is 30th November 2011.
7. The last date to appear for RHCVA exam is 31st December 2011.
8. The fees has to submitted minimum 7 days before the examination day to Red Hat India Pvt. Ltd.,
9. The examination fee is non refundable.
10. Once registered and scheduled, no change in the examination date is possible.
11. Once registered, the candidate cannot replace themselves with another prospect.
12. It is mandatory for students registering for either scheme to attempt RHCSA & RHCE examinations first time on the same day.

RHCSA

Documents required to register:
◦ Certification exam discount coupon of SAI & SAII for RHCSA.
◦ Certification exam discount coupon of SAI, SAII and SAIII for RHCE.
◦ Certification exam discount coupon of RHEV for RHCVA.
◦ It is mandatory to provide Govt. issued ID card such as Driving License, Passport, Voter ID card, etc., on the day of the exam, in original.
◦ Candidates registering for either scheme must submit 3 passport size photographs.
◦ All the forms should be completely furnished by the student and signed by the concerned center manager/
director and sealed by the training institute where the participant has undergone training.

Please note:
If the candidate has availed the discount, but fails to produce the registration form and discount voucher on the day of examination, he would forfeit the exam fee paid and would not be allowed to appear to the examination. Those candidates who have registered for any scheme cannot claim any refund, if they get certified as RHCSA or RHCE or both in the first attempt.
Dates to Remember
• Last date to register for any scheme: 20th November, 2011
• Last date to appear for first attempt of RHCSA & RHCE: 25th November, 2011
• Last date to appear for second attempt of RHCSA & RHCE: 30th November, 2011
• Last date to appear for first attempt of RHCVA: 31st December, 2011

Pawan Sharma | September 12, 2011 | | Be the first to comment!

Creating and Deleting Partitions in RHEL 6

Partitioning is a very important concept in Linux. If you have your concepts clear,  related to partitioning in Linux, it will be very helpful when you became a Linux System Administrator.

There is a new partitioning tool RHEL6 cfdisk, but we will see the traditional and most popular partitioning tool "fdisk". To use fdisk first you have to login as root. if you are a regular user and know root password, you can switch to root account using "su" command.
  • To see your current disk and partitions run: fdisk -l

In the above image you can see that I have two hard disks. The first one is /dev/sda and the other one is /dev/sdb. In the above image you can see that the HDD /dev/sda is of size 16 GB and having two partitions /dev/sda1, which is created at the time of installation as /boot, and /dev/sda2, which is a Linux Logical Volume Manager(LVM). The second HDD is /dev/sdb which is newly installed HDD of size 2 GB and does not contain any valid partition table as you can see in the image.

In this post we will create the physical partitions and mount them on particular directories.
  • To create a partition of 1 GB form /dev/sdb type :fdisk /dev/sdb, and press m to see menue.
  •  Press n to create new partition, p to create primary partition and e to create extended(always create first partition as primary), make partition 1, select first cylinder as default and on next line type +size of partition to be created,ex +1G.


  • Now press p to print current partition table and press w to save partition table. and on command prompt type partprobe to update current partition table and run fdisk -l /dev/sdb.

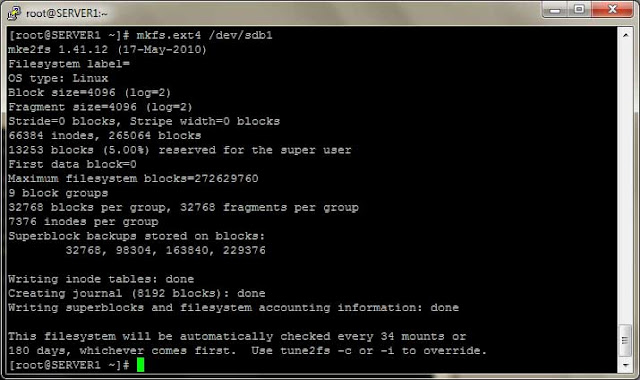
  •  Now format this partition with command : mkfs.ext4 /dev/sdb1. Then create a directory /mydata, and mount /dev/sdb1 on /mydata using command : mount /dev/sdb1 /mydata.


  • Make entry in /etc/fstab to make mounting persisting, means mount /mydata every time when server restart.
In next post we will learn how to create partition using Linux Logical Volume Manager(LVM) .
Please comment if you have any doubts.


Pawan Sharma | September 7, 2011 | | Be the first to comment!

RHEL 6 File-System


     In this post we will discuss about the file system in RHEL 6. In Linux operating system there is a pre-defined location to store different files. 


     The Linux file system can be defined as the method of storing and organizing files in a form that we can understand easily. In Linux operating system everything is a file. To manage all these files Linux have a tree like directory structure. File system is a method of storing and organizing arbitrary collection of data in a form that is human readable.


File system structure of RHEL 6:


    • / :- Root directory, which contains all other directories.
    • /bin :- Contains commands that may be used by both system administrator and by users, but which are require when no other file-systems are mounted. 
    • /boot :- This directory contains everything which required for the boot process, like kernel, GRUB, Initrd, etc.
    • /dev :- Contains device files.
    • /etc :- Contains configuration files.
    • /home :- Contains users’ home directories.
    • /lib :- Essential shared libraries and kernel modules.
    • /media :- Mount point for removable media.
    • /mnt :- Mount point for temporary mounted file-system.
    • /opt :- Contains add-on/optional packages.
    • /root :- Root user’s home directory.
    • /sbin :- Contains system binaries.
    • /tmp :- Contains temporary files.
    • /var :- Contains variable data files.
    • /proc :- Contains kernel and process information.
    Pawan Sharma | September 5, 2011 | | Be the first to comment!

    Managing User and Group in RHEL 6

         To create a user in RHEL 6 we can use commands as well as graphical user administration tools. It is advisable to use command line as much as possible because it is faster and in real business environment you have to use ssh to remotely take control to administer the system.

    • To create a user run command:
      • useradd user_name
    • To define a password for the user:
      • passwd user_name
    • Create a user with specific UID:
      • useradd -u 802 user_name
        • The above command will create a user with UID 802.
    • To create a group run command:
      • groupadd group_name
    • To delete a user run command:
      • userdel user_name
        • The above command will delete the user but it will not delete the home directory of user. To delete the home directory as well as the files contained in it run following command"
        • userdel -r user_name

    User and Group Administration
    Given below are some sample questions about user and group administration:

    Q1. Create a user rambo and make it a member of group student.
    Ans. useradd -G student rambo.
            To see the results view /etc/passwd and /etc /group files.
    Q2. Create a user sheela with UID 566 and assign it no interactive shell.
    Ans. useradd -s /bin/false sheela
            The above command will add a user sheela, and give it non interactive shell.
    Q3. Make the user munni to expire on date 17-09-2011.
    Ans. chage -E 2011-09-17 munni
            The above command will make the account of user munni unavailable from 17-09-2011
    Q4. User pandeyg have to change password at the time of next login.
    Ans. chage -d 0 pandeyg
            The above command will force user to change password when the user tries to login.

    Pawan Sharma | September 4, 2011 | | Be the first to comment!

    Sample Questions for User and Group Administration

          For the preparation of RHCSA and RHCE certification exam, the most important thing is to do lots of practicals. There are no real dumps available for RHCSA/RHCE exams as these certification exams are totally hands on. In this post I will give some sample questions and their answers. These  sample exercises are based on User and Group Administration.
          In my few next posts I will post sample questions and their answers, related to User and Group Management. The questions in next few posts are like:-

    • How to create a user in RHEL 6 with unique UID?
    • How to create a group in RHEL 6?
    • How to create a user and add it to a specific group?
    • How to create a user john and assign him no interactive shell?
    • How to set password expiration for a user?
    • Request for password change, when user next login.
    • How to change password for a user?
    • How to delete a user in RHEL 6?

    Pawan Sharma | July 5, 2011 | 1 Comment so far

    Update: RHCSA and RHCE Fees in INDIA

         There is a lot of confusion regarding the fees of RHCSA and RHCE in INDIA. People creating rumors that fees of RHCSA and RHCE on RedHat Enterprise Linux are very higher as compared to RHCT and RHCE on RHEL 5.
         With the release of RHEL 6 RedHat introduces a new pattern of certification exam. On previous version (RHEL 5) you have to complete both RHCT and RHCE to get RHCE certificate but you don't get the RHCT certificate if you clear both the exam. But now you have to pass the RHCSA exam to gain RHCE and you will get two different certificates one for RHCSA and other for RHCE.

         The fee structure of RedHat Certification is given below:
    • Fees of RHCSA is INR 8000
    • Fees of RHCE is INR 8000
         So, if you want RHCE certification you have to pay a total of Rs. 1600 and Rs. 3000 for the official RedHat exam books.

         But there are lots of schemes which RedHat offering in INDIA so please check latest updates of RHCSA and RHCE fees.
    Pawan Sharma | | Be the first to comment!

    64 bit Operating Installation on 32bit architectuer

         People ask me many times that "can I install a 64-bit Linux or any other Operating System in to my Virtual Machine, even though if I have a 32-bit processor on my computer".
         The answer is "NO". If you have a 32-bit processor on your computer,VMware does not provide facility to virtualize the 32-bit processor to 64-bit processor. Because all the CPU requests from Virtual Guest CPU are processed by the real CPU. So you definitely need a 64-bit processor to run a 46-bit Virtual Guest Operating System.


    CONCLUSION:
    OS Architecture
    • You can not install a 64-bit Virtual Guest Operating System on 32-bit Host machine.

    Please comment on my posts and help me to correct if I am wrong.
    Pawan Sharma | June 10, 2011 | | Be the first to comment!

    Group Administration

    In the last post I described about the the user administration. After user administration another task is to manage groups. 
    To see the present groups in your system you can type groups command. The /etc/group maintains the group membership information. You create groups and add users to a group using both GUI tool and Command line, but I will suggest you to use command line because it is fast and easy. Once you have been familiar with the command line you will enjoy using it the most.

    To create new group you can edit /etc/group file or you can run the following command:
    • groupadd group_name : this will add a group named group_name in /etc/group.
    • groupdel group_name : this will delete a group named group_name in /etc/group.
    • groupmod : modifies group members.
    • chgrp : to change group permissions.
    GROUP ADMINISTRATION
     To add users named donna to a group named sales you can run the following command:
    • usermod -G sales donna : this command will add user donna to the group sales.
    OR
    • You can add user donna directly to the /etc/group 
      • sales:x:503:donna

    To add a user to a group at the time of creation of user, you can type the following command:
    • useradd -G sales mike : this command will make a user mike and add it to the sales group.
    You can also use Graphical User Interface for user and group administration.
    To open the USER and GROUP GUI run system-config-users at the command line or
    • Go to System-->Administration-->Users and Groups.
    You can do a lot with users and groups like provide special privileges to specific users or groups and also can do the group collaboration. We will discuss these topics in the next post.
    ..................................................................................................................................................................
    Pawan Sharma | June 8, 2011 | | Be the first to comment!

    Basic Linux Commands

    To start-up with the Linux first someone needs to know about the basic Linux commands. These commands are common in all Linux distributions. If you know these basic Linux commands, it will be easy for you to get further in in your goal to achieve a RedHat Certification.

    To be a system administrator you need to know how to manage the server using command line, because you will hardly allowed to use GUI. Because most of the system administration tasks are managed remotely using the secure shell also known as SSH. So use the command line as much as possible.

    Basic Linux Commands and there explanation is given below:

    • uname :- this command returns the name of Operatng System.
    • uname -a :- using :- "a" option with uname command, you will get the following information:
      • Operating System : Linux.
      • Fully Qualified Domain Name.
      • Kernel Version.
      • Date and time that the kernel was compiled.
    • tty :- reveals the current terminal.
    • echo :- prints to the screen.
    • set :- prints and optionally sets shell variables.
    • clear :- clears the screen / terminal.
    • reset :- resets the screen buffer
    • pwd :- prints the path of working directory.
    • whoami :- reveals the current logged-in user.
    • which programe_name :- reveals the path of the program / command.
    • history :- reveals your command history.
    • cd :- changes directory to desired directory:
      • cd with no option will changes to the home directory.
      • cd ~ will also change to the home directory.
      • cd /  will change to the root (/) directory
      • COMMAND LINE
      • cd ..  will change one level up in the directory tree.
    • ls  :- lists files and directories.
      • ls / lists the contents of / (root) directory.
      • ls -l will lists in long format. This command shows properties of files and directories.
      • ls -a will list all files including hidden files which starts with a period (.).
      • ls -ld will show properties of the directory.
    • cat  :- catinates files. Create files and also show contents of files.
      • cat 123.txt dumps the contents of the file 123.txt.
      • cat > xyz creats new file xyz. You can write to the file and save using ctrl+d.

    • mkdir  :- creates a new directory.
    • cp :- copies files
    • mv :- moves and rename files.
    • rm :- remove files.
    • touch :- create a blank file.
    • stat :-  reveals the statistics of a file.
    • find :- finds files using search pattern.
      • find / -name filename will search the file named filename in the / directory/
    • alias :- return/set aliases for command.
    • more/less :- display one page at a time.
    • head :- display opening lines of a file.
    • tail :- display cloasing lines of a file.
    • wc :- counts words and optionally lines and characters in a file.
    • grep :- search for text in a file.
    • su :- to switch user.
    • man command_name  :- open manual for that command.
     These are the the basic Linux commands. But there are a lot more commands, you will learn command while using it, it will take time but more you work in linux more you learn.

    NOTE : There are many options which can be used with these commands or other commands. Always view man pages of command to find different options. I think using man command is very good habit.

    Please comment on the post. You can also write questions and I would love to answer your questions and help you.
    Pawan Sharma | March 29, 2011 | | 2 Comments so far

    Booting in to RUNLEVEL of your choice


    One key skill is to understanding how to boot system in to different runlevels. Everyone, who wants to attempt the Red Hat Certified System Administrator exam, should know how to boot into different runlevels during the boot process. This is explicitly described as an RHCSA requirement. In this section I will explain you how to boot system in to different runlevel for troubleshooting and maintenance. In this section you will use GRUB menu to boot in to different runlevels. 

    Here are simple steps which explains HOW TO BOOT IN TO RUNLEVEL OF YOUR CHOICE:

    • When you boot the system BIOS looks for the MBR and finds GRUB to edit the directives in GRUB menu, press any key before the following message expires (normally in 5 seconds):
    “Press any key to enter menu”

    You will see menu similar to figure given below, from where you can modify how GRUB boots into Linux.
    GRUB BOOT menu of RHEL 6

    •  If the menu is password protected, you will have to press p before entering the password.
    •  Then press a to access the kernel command line.
    • At the end of kernel command line, type a space followed by the runlevel of your choice. For example 1 or single, 2,3, and 5.
    •  And press b to boot. You will now boot in to the runlevel you specified in above step.

    Reboot your system and you can see that now the system boots in its default runlevel, because editing kernel entries from GRUB menu does not make changes in /etc/inittab file which have an entry for default runlevel. To make your changes permanently you have to edit the /etc/inittab file.

    The main purpose for booting system into different runlevel is to correct serious problems in the system. And to correct we use the single-user mode or runlevel 1.

    At the GRUB menu you can use following commands:

              Command           Description
    •   b                        Boot the current listed Operating System
    •  d                        Delete the current line
    •  e                         Edit the current line
    • o                         Create empty line underneath the current line
    • O                        Create an empty line above the current line
    •  
    These options/commands can be used at boot menu to booting in to different runlevel.
    Pawan Sharma | March 28, 2011 | | Be the first to comment!

    Runlevels in RHEL 6


              In this post I will explain you about different RUNLEVELS in RHEL 6. All Linux services are organized by runlevels. Runlevels can be used to halt or reboot the system, some runlevels can boot Linux with or without networking services. There are six runlevels and each runlevel executes a specified set of scripts. Runlevel and description of each runlevel is given below:


                    Runlevel              Description
    • ·         0                              Halt
    • ·         1                              Single-user mode, for maintenance and repairs
    • ·         2                              Multiuser, with some networking services
    • ·         3                              Multiuser, with networking
    • ·         4                              Unused
    • ·         5                              X11 console, Defaults to a GUI desktop with networking
    • ·         6                              Reboot

              All of these runlevels are defined in /etc/inittab file which is first process and which decides the default runlevel and to launch scripts for a particular runlevel. The functionality of each runlevel is given below:

    • ·         Runlevel 0 will halt the system, never sets this runlevel your default runlevel.
    • ·         Runlevel 1, also known as single-user mode, only one user is allowed to connect to Linux system.    This runlevel is used for system maintenance, repairs, backups and restores.
    • ·         Runlevel 2 is a multiuser with some networking. This runlevel is used for configuring the system  performance.
    • ·         Runlevel 3 is a also multiuser environment with all the networking services. This runlevel or console is used by the system administrator or other general users. This is a text based console
    • ·         Runlevel 4 is Unused. One can edit this runlevel to make it customized to use.
    • ·         Runlevel 5 is a X11 console. This runlevel defaults to a GUI login screen. Logins bring the user to a Graphical User Interface desktop with all networking services.
    • ·         Runlevel 6 will reboot the system. Never set the initdefault (default runlevel) to this value. This will enter a continuous reboot cycle.


              Each runlevel have some series of scripts associated with it. All scripts are collectively stored in /etc/rc.d/init.d directory and all runlevels also have their own directory which contains some start and stop scripts. The scripts associated with each runlevel can be found in /etc/rc.d directory:

              rc0.d
              rc1.d
              rc2.d
              rc3.d
              rc4.d
              rc5.d
              rc6.d

              In someone’s Linux system the default runlevel is 5, init process will in /etc/rc.d/rc5.d and run each “kill” and ”start” script. The kill script is a file or symbolic link to the file with a name that begins with “K”. Likewise, start script is a file or symbolic link to the file with a name that begins with “S”.


    Pawan Sharma | March 27, 2011 | | Be the first to comment!

    GRUB menu of RHEL 6


             In my previous post I explain the BOOT PROCESS of RHEL 6. In this post I will explain you the GRUB boot loader and files associated with the GRand Unified Boot loader.
             The Standard Boot loader associated with Red Hat Enterprise Linux is GRUB, the GRand Unified Boot Loader. As suggested by the Red Hat exam requirements, for RHCSA exam, you need to know how to use Grub menu to boot in to different runlevels, and diagnose and correct boot failures arising from boot loader errors.

             When you start your computer, your BIOS look for the /boot directory and finds the GRUB menu, which will look similar to figure below:

    RHEL 6 GRUB Menu


    To understand the GRUB, the best place is to start is form GRUB configuration file.
    You can find grub configuration file ‘grub.conf’ in /boot/grub/ folder and also you can find a hard link of ‘grub.conf’ file in /etc/ directory. The contents of a GRUB configuration file in RHEL 6 are given below:

    # grub.conf generated by anaconda
    #
    # Note that you do not have to rerun grub after making changes to this file
    # NOTICE:  You have a /boot partition.  This means that
    #          all kernel and initrd paths are relative to /boot/, eg.
    #          root (hd0,1)
    #          kernel /vmlinuz-version ro root=/dev/sdb3
    #          initrd /initrd-[generic-]version.img
    #boot=/dev/sdb
    default=0
    timeout=5
    splashimage=(hd0,1)/grub/splash.xpm.gz
    hiddenmenu
    title Red Hat Enterprise Linux (2.6.32-71.el6.i686)
          root (hd0,1)
          kernel /vmlinuz-2.6.32-71.el6.i686 ro root=UUID=0d96a842-0806-42fb-84af-2ae0676fd40d rd_NO_LUKS rd_NO_LVM rd_NO_MD rd_NO_DM LANG=en_US.UTF-8 SYSFONT=latarcyrheb-sun16 KEYBOARDTYPE=pc KEYTABLE=us crashkernel=auto rhgb quiet
          initrd /initramfs-2.6.32-71.el6.i686.img
    title Windows 7
          rootnoverify (hd0,0)
          chainloader +1


               Every line which starts with ‘#’ is a comment. The comment lines don’t affect the working of the GRUB file. First line suggests that this file is created by anaconda, which is the RHEL 6 installation program.

    The actual commands in this file are:
    ·         default=0 : this means that GRUB will boot RHEL 5 by default.

    ·         Timeout=5 : this means, before GRUB automatically boots the default Operating System it will wait for 5 seconds.

    ·         splashimage : directive locates the graphical GRUB menu screen which is located at (hd0,1)/grub/splash.xpm.gz

    ·         hiddenmenu: directive means that the GRUB options are hidden, with the message shown below:
    Booting Red Hat Enterprise Linux Server (2.6.32-71.el6.i686)

    This GRUB configuration file can be used to diagnose and recover GRUB problems.
    Pawan Sharma | March 24, 2011 | | 12 Comments so far

    Boot Process of RHEL 6

    To became a Redhat Certified System Administrator you should have to know about the boot process of RHEL 6. In this post I will explain you the boot process of the latest Redhat Enterprise Linux 6. RHEL uses GRUB (GRand Unified Boot Loader) as its boot loader. The step-by-step boot process is explained below.


    • First we power on the machine, then BIOS (Basic Input Output System) takes over. BIOS is responsible to check RAM, Keyboard, Storage Devices, etc.
    • Once the BIOS has setup the environment it finds the first bootable device (which may be CD-ROM, USB, IDE, SATA Hard Drive, etc.) 
    • After BIOS finds first bootable media it searches for the Master Boot Record (MBR), which contains boot code, this stage is called STAGE 1 GRUB.
    • After Stage 1GRUB, STAGE 1.5 GRUB is consulted, which presents a menu to the user. From that menu we select the OS that we would like to boot. (Grub files are stored in /boot/grub.).
    • After that STAGE 2 GRUB is consulted. Stage 2 GRUB sets up the environment and then calls INIT process. The INIT process is located in /sbin/init. INIT reads a special file /etc/inittab, this is a table file which contains initialization entries like default runlevel and then sets up the appropriate runlevel environment. 
    • All the scripts which are collectively stored in /etc/rc.d/init.d directory and rc.d contains runlevel directories like rc1.d, rc2.d,....rc6.d.
    After all these process a runlevel environment is setup and you are able to do tasks on the Redhat EL 6.

    Boot Process Summary:

    Power On -> BIOS -> Searches for MBR in Bootable Media -> Finds Boot Code (Stage 1 GRUB) -> GRUB Menu (Stage 1.5 GRUB) -> Stage 2 Grub (Setup the environment calling INIT Process) -> Executes scripts of appropriate runlevel and provides the console. 

    For any query regarding to GRUB or BOOT Process please comment .....
    You can also subscribe for latest news and posts for RHCSA, RHCE, RHEL 6........
    Pawan Sharma | March 22, 2011 | 19 Comments so far

    RHCSA Tutorials

            Redhat Certified System Administrator is a certification exam which is purely based on the practical knowledge. I personally searched on the web but never find any good tutorial of preparation material, for RHCS, till now. Some websites also offering CBT video tutorial for RHCSA but I think they are too costlier. 

             I have decided to make a tutorial (ebook) for preparation of Red Hat Certified System Administrator. And I have started working on it. In that e-book I will explain all the Objectives which have to be achieved in the RHCSA certification exam. Also give details on how to prepare for the exam.

            It will take a little time for completing the e-book so I will also post the required information on the blog.
    You can find all the Objectives explanation in this blog....

    If you have any queries or want to know something about RHCSA comment on the posts or email me.
    Pawan Sharma | March 20, 2011 | | 2 Comments so far

    Post Installation Steps for RHEL 6

    In my last post I explain the steps for installation of Redhat Enterprise Linux 6. In this post I will explain the Post installation Steps, which are required to complete your installation. Since this is an important objective for RHCSA, understanding all the installation steps is a must.

    After package installation reboot your system and from there you have to follow the post installation steps:
    Step 1. After rebooting welcome screen appears,  click forward button for the next step.
    http://linux-rhcsa-rhce.blogspot.com


    Step 2. In License Information screen click on "yes, I agree to License Agreement" and click forward.

    RHCSA


    Step 3. Then do the software update process. But to do that you should have a subscription from Red Hat Network(RHN). And click forward to continue.
    RHCE


    Step 4.  Next screen allows you to create a regular USER. Provide username, full name and password and click forward to continue.
    RHEL 6 Post Installation


    Step 5. In the Date and Time setup wizard enter the date and time and click forward to continue.
    Linux Certification


    Step 6. In the next screen you can setup a KDump environment. It is up to you to setup a KDump environment.
    http://linux-rhcsa-rhce.blogspot.com


    KDump is a Kernel Crash Dumping Mechanism it will prevent you from kernel crash. It is recommended to setup a KDump environment.

    After setting-up the KDump environment you are now ready to login to the RHEL 6 server..


    If you have any queries email me or comment .......
    You can also subscribe for the latest posts so you don't miss any information or news.