To learn Red Hat Enterprise Linux 6 first of all you have to know about the installation process and how to install the all new Red Hat Enterprise Linux 6. Here I will explain the step-by-step process of installation of RHEL 6.
Installation of RHEL 6 is one of the objectives of RHCSA and RHCE certification from Red Hat. It is directed that one should know at least the graphical based installation of RHEL 6.
First of all you have to obtain the DVD/CDs’ or the RHEL6 DVD.iso.
There are several methods of installing RHEL 6 like: installation from DVD, installation form Hard Drive, Network Installation, Installing via NFS, FTP or HTTP. Steps followed in all the process are same except the media selection from which you will install RHEL 6. I will explain the installation from Local Hard Drive using the Rescue disk (Which can also downloaded from Red Hat website), and the RHEL 6.iso.
Step 1. Extract the folder “images” from the RHEL 6 DVD. Since the image folder contains the product.img file which is used to start the installation and bring up the anaconda to start installation process.
Step 2. Make a folder from where you want to install Red Hat Enterprise Linux 6 and in it paste the “RHEL 6 DVD.iso” file and the “images folder “ which you have extracted in the above step.
I had created the folder in the E: drive of my computer like E:\RHEL6\ and paste the “RHEL 6 DVD.iso” file and the “images folder “ in it. But at the time of installation you have to give the complete path of the “.iso“ image like the hard disk and partition number like “/dev/sdb5/RHEL6/”.
Step 3. Reboot the System and boot form the rescue disk by selecting boot form CD/DVD from the boot menu. After booting form rescue disk you will see the graphical boot menu.
Step 4. There are four options in the menu : 1. Install or upgrade existing systems, 2. Install system with basic video drivers,3. Rescue installed system, 4. Boot from local drive.
Select the first option “Install or Upgrade Existing System”.
Step 6. Select installation method : Local CD/DVD and click ok.
Step 7. Select partition and determine full path of the folder containing RHEL 6 DVD.iso. In my case the partition is “/dev/sdb5” and the path is “/Operating System/RHEL6/ISO”.
Step 8. Welcome screen appears click next to continue.
Step 9. Select Installation Language and Keyboard Type.
Step 10. Select type of storage device. If you are confused in between select the Basic Storage Devices.
Step 11. Time Zone Configuration window. Select time and click next to continue.
Step 12. Set Root password and click next.
Step 13. Assign storage device from the box on the left side and send it to the box in right. I have to install RHEL 6 in my 80 Gb sata HDD so I seletct the second HDD and move it to right box (Install Target Devices).
Step 14. In the next step you have to select how you want to use your HDD to install RHEL 6. I prefer to make file systems manually, so I selected create custom layout.
Select the free space in the HDD (and if no free space is there you have to delete some partitions to create free space.) and click on Create. A dialog box open select the Standard Partition and click next.
Give the mount point select size and make it primary or extended as per your requirements.
Make at least three partitions :root (/), boot (/boot) and SWAP.
Take reference from the table given below to make partitions:
Click next to continue.
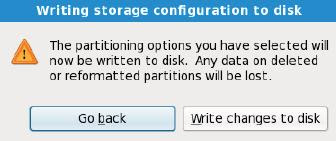
Click on write changes to disk to make changes. Or go back to edit layout.
Step 15. Install Grub Boot Loader.
I have my PC dual boot Windows 7 and RHEL so I make an entry of my windows 7 OS and select it to boot by default.
Step 16. Installation Server type. Select an option according to your requirements or just select Basic Server and Choose Now to select packages.
Step 17. Wait while packages install.
Step 18. Installation Complete .remove bootable media form DC/DVD drive and restart your system.
I will publish Post Installation Steps in my next post .
Please comments if you have any questions regarding any of the above steps……


Hi pawan.
ReplyDeletegood work.It is very useful to beginners.